Rth9585WF Installation Manual: A Comprehensive Guide (Updated 12/03/2025)
Today’s date is 12/03/2025 20:22:41․ This manual unlocks the full potential of your Rth9585WF, detailing features and functionalities for optimal operation and enjoyment․
Welcome! This section introduces your new Honeywell Home Rth9585WF thermostat, a smart and connected device designed to provide optimal comfort and energy savings․ This thermostat offers advanced features like geofencing, smart scheduling, and remote control via the Honeywell Home app․
The Rth9585WF isn’t just a temperature controller; it’s a central hub for managing your home’s climate․ This manual will guide you through the installation process, ensuring a seamless transition and maximizing the benefits of your new system․ Understanding its capabilities will empower you to create a personalized and efficient heating and cooling experience․ Prepare to unlock a new level of home comfort and control!
Package Contents & Initial Inspection
Carefully unpack your Rth9585WF thermostat package․ Ensure all listed components are present: the Rth9585WF thermostat unit, the mounting backplate, screws and wall anchors for installation, wire labels for easy identification, and this comprehensive installation manual․
Inspect each item for any signs of damage incurred during shipping․ If any parts are missing or appear damaged, do not proceed with installation․ Immediately contact Honeywell Home Support (see contact information at the end of this manual) for assistance and replacement parts․ Proper initial inspection prevents complications later and guarantees a smooth setup process․ Retain the original packaging for potential returns․
Safety Precautions
Prioritize safety during installation! Always disconnect power to your HVAC system at the breaker box before beginning any wiring․ Failure to do so could result in electrical shock or damage to your equipment․ If you are uncomfortable working with electrical wiring, consult a qualified HVAC technician․
Exercise caution with wiring․ Incorrect wiring can damage the thermostat or your HVAC system․ Double-check all connections against the wiring diagram․ Keep wires away from sharp edges and moving parts․ This thermostat is designed for indoor use only; do not expose it to moisture or extreme temperatures․ Follow all local electrical codes․
Tools Required for Installation
Ensure a smooth installation process by gathering the necessary tools beforehand․ You will need a Phillips head screwdriver for mounting the backplate and connecting wires․ A small flathead screwdriver may be helpful for terminal connections․ Wire strippers are essential for preparing the wires for secure attachment․
Additional tools for convenience include a level to ensure the thermostat is mounted straight, and a pencil for marking screw locations․ A voltage tester is highly recommended to verify power is off before handling wires․ Finally, have a digital camera or smartphone handy to photograph the existing wiring configuration before disconnecting anything – this is invaluable for reference!
System Compatibility Check
Before beginning installation, verifying system compatibility is crucial for optimal performance․ The Rth9585WF is designed to work with most 24V heating and cooling systems, including furnaces, air conditioners, heat pumps, and boilers․ However, it’s not compatible with line voltage systems (110V/240V) or millivolt systems;
Carefully review your existing system’s wiring to confirm it utilizes a standard 5-wire configuration (R, C, W, Y, G)․ If you have a high-efficiency furnace, a C-wire (common wire) is required for consistent power․ If a C-wire isn’t present, a C-wire adapter may be necessary – consult a professional if unsure․
Compatible HVAC Systems
The Rth9585WF thermostat seamlessly integrates with a wide array of HVAC systems commonly found in residential settings․ This includes forced air furnaces (gas, oil, electric), central air conditioning units, and heat pump systems – both standard and dual-fuel configurations․ It also supports hot water baseboard heating systems when paired with the appropriate adapter (sold separately)․
However, compatibility is limited with certain specialized systems like radiant floor heating without an adapter, or systems utilizing proprietary communication protocols․ Always verify your system’s voltage and wiring configuration before proceeding with installation․ For non-standard systems, consulting a qualified HVAC technician is strongly recommended․
Voltage Requirements
The Rth9585WF thermostat is designed to operate with standard 24VAC (Volts Alternating Current) HVAC systems, which is the industry standard for low-voltage thermostat control․ Do not connect this thermostat to systems with line voltage (120VAC or 240VAC) as this will cause severe damage and poses a significant safety hazard․
Proper voltage is crucial for reliable operation and preventing damage to the thermostat and your HVAC equipment․ If you are unsure about your system’s voltage, consult a qualified HVAC technician before attempting installation․ Incorrect voltage can void the warranty and create a dangerous situation․
Wiring Diagram Overview
Understanding the wiring is paramount for a successful Rth9585WF installation․ This section provides a foundational overview of the wiring diagram, crucial for correctly connecting the thermostat to your HVAC system․ Carefully review this information before proceeding․ The diagram illustrates the terminal designations and common wiring configurations, ensuring accurate connections․
Incorrect wiring can lead to system malfunction or damage․ Always double-check your connections against the diagram and your existing thermostat’s wiring․ If you are uncomfortable with electrical work, consult a qualified HVAC professional for assistance․ Safety is the top priority during installation․
Identifying Terminal Designations (R, C, W, Y, G)
Accurate terminal identification is critical for proper Rth9585WF functionality․ R typically signifies 24VAC power, while C is the common (neutral) wire – essential for consistent power․ W controls heating, activating your furnace or heat pump․ Y manages cooling, engaging the air conditioner․ Finally, G operates the fan, circulating air throughout your home․
Misidentifying these terminals can cause significant issues; Refer to your HVAC system’s documentation and the existing thermostat’s wiring for confirmation․ If unsure, consult a qualified technician․ Correctly labeling each wire before disconnection simplifies the installation process and minimizes errors․
Understanding Common Wiring Configurations

Several wiring setups exist for the Rth9585WF, depending on your HVAC system․ A standard 5-wire configuration utilizes R, C, W, Y, and G․ Systems without a C-wire may require a C-wire adapter (sold separately) for reliable operation․ Heat pump systems often incorporate an additional wire for reversing valve control (O/B)․
Carefully examine your existing wiring and compare it to the diagrams provided․ If you encounter a configuration not illustrated, consult a professional HVAC technician․ Incorrect wiring can damage your thermostat or HVAC equipment․ Always prioritize safety and accuracy during installation․
Step-by-Step Installation Guide
Begin by turning off power to your HVAC system at the breaker box․ Carefully remove your old thermostat, noting the wire connections․ Mount the Rth9585WF backplate using the provided screws, ensuring it’s level․ Connect the wires to the corresponding terminals on the backplate, referencing the wiring diagram․
Double-check all connections for security; Attach the thermostat to the backplate until it clicks into place․ Restore power to the HVAC system․ The thermostat should power on and guide you through the initial setup process․ Follow the on-screen prompts for optimal configuration․
Removing the Old Thermostat
Prioritize safety: Turn off power to your HVAC system at the circuit breaker before proceeding․ Carefully remove the cover of your existing thermostat, exposing the wiring․ Take a clear photograph of the existing wiring connections – this is crucial for reference during the Rth9585WF installation․
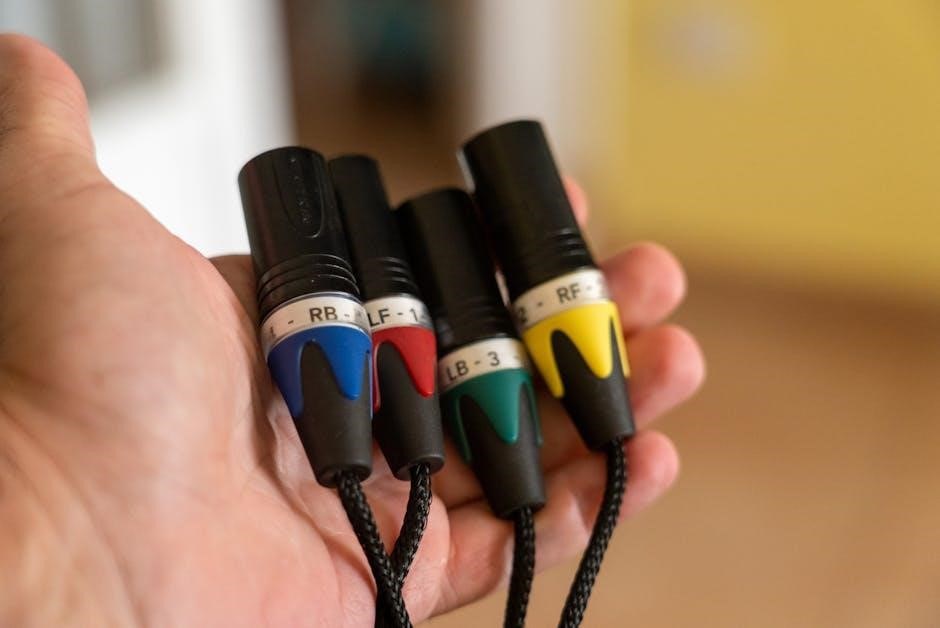
Label each wire with the corresponding terminal designation (R, C, W, Y, G) using the provided labels․ Disconnect the wires one at a time, avoiding any accidental shorts․ Remove the old thermostat baseplate from the wall․ Ensure the wall surface is clean and prepared for the new backplate․
Mounting the Rth9585WF Backplate
Position the backplate on the wall where the old thermostat was located, ensuring it’s level․ Use the provided screws and wall anchors (if necessary) to securely attach the backplate to the wall․ Verify the backplate is firmly mounted and doesn’t wobble․
Feed the thermostat wires through the opening in the backplate․ Ensure sufficient wire length is available for easy connection to the terminals․ Double-check that the backplate is oriented correctly before proceeding to the wiring stage․ A secure and properly aligned backplate is essential for a stable installation․
Connecting the Wires
Carefully connect each wire to the corresponding terminal on the backplate, referencing the wiring diagram․ Ensure each wire is securely fastened to its terminal – a loose connection can cause malfunctions․ Double-check that the wire colors match the terminal designations (R, C, W, Y, G)․
Avoid stripping the wires excessively; expose only enough wire to make a solid connection․ Gently tug on each wire to confirm it’s firmly held in place․ If you encounter difficulty, re-examine the wiring diagram and ensure correct placement․ Proper wiring is crucial for the thermostat’s functionality․
Attaching the Thermostat to the Backplate
Align the thermostat body with the mounted backplate, ensuring a snug and secure fit․ Gently press the thermostat onto the backplate until it clicks into place․ Do not force it; if resistance is felt, re-check the alignment․ Verify that the thermostat is firmly attached and doesn’t wobble․
A secure connection is vital for proper operation and prevents accidental disconnections․ Inspect the edges to confirm a flush fit against the backplate․ Once attached, the thermostat should feel stable and well-integrated with the wall․ This step completes the physical installation process․
Powering On & Initial Setup
After securely attaching the thermostat, restore power at the breaker․ The Rth9585WF should automatically power on, displaying the Honeywell Home welcome screen․ If it doesn’t, double-check the wiring connections and breaker status․ The initial setup wizard will guide you through essential configurations․
You’ll be prompted to select your language, date, and time settings․ Accurately input this information for correct operation․ The thermostat will then ask about your HVAC system type – accurately identifying this ensures optimal performance․ Follow the on-screen instructions carefully to complete the initial setup process․

Connecting to Wi-Fi
To unlock smart features, connect your Rth9585WF to Wi-Fi․ From the thermostat’s main screen, navigate to the settings menu and select “Wi-Fi․” The thermostat will scan for available networks․ Choose your home network from the list and enter your password when prompted․
Ensure you’re using a 2․4 GHz network, as the thermostat may not support 5 GHz․ A strong Wi-Fi signal is crucial for reliable connectivity․ Once connected, the thermostat will display a confirmation message․ If connection fails, verify your password and router settings, then try again․
Honeywell Home App Configuration
Maximize control with the Honeywell Home app! First, download and install the app from your device’s app store (iOS or Android)․ Next, create a Honeywell Home account, or log in if you already have one․ Within the app, select “Add a Device” and follow the on-screen instructions․
The app will guide you through connecting your Rth9585WF thermostat to your account․ Ensure your thermostat is powered on and connected to Wi-Fi․ You may need to enter a unique code displayed on the thermostat screen․ Successful pairing unlocks remote access and advanced features․
Downloading and Installing the App
Begin by accessing your smartphone’s app store – the Apple App Store for iOS devices or the Google Play Store for Android․ Search for “Honeywell Home” within the app store search bar․ Locate the official Honeywell Home app, identified by the Honeywell logo․ Tap the “Install” button to initiate the download and installation process․
Allow the app the necessary permissions requested during installation․ Once installed, the Honeywell Home app icon will appear on your device’s home screen․ Tap the icon to launch the app and prepare for account creation or login․ Ensure a stable internet connection throughout this process․
Creating an Account & Adding the Thermostat
Upon launching the Honeywell Home app, you’ll be prompted to create a new account․ Enter a valid email address and create a secure password․ Follow the on-screen instructions to verify your email address․ Once verified, log in to your newly created account․
Within the app, select the option to “Add a Thermostat․” The app will guide you through the process of connecting your Rth9585WF․ Ensure your thermostat is powered on and in pairing mode․ Follow the app’s prompts to locate and connect to your thermostat via Wi-Fi․
Programming Schedules & Settings
The Honeywell Home app allows for detailed scheduling to optimize comfort and energy savings․ You can create custom schedules based on your daily routines, setting different temperatures for wake, leave, return, and sleep periods․ Explore the options to define unique schedules for weekdays and weekends, tailoring the system to your lifestyle․

Beyond basic scheduling, adjust settings like temperature hold duration, swing temperature range, and fan control․ Fine-tune these parameters to achieve your desired level of comfort․ Experiment with different settings to discover what works best for your home and preferences, maximizing efficiency․
Geofencing & Smart Features
Leverage the power of geofencing through the Honeywell Home app! This intelligent feature automatically adjusts your thermostat based on your location․ As you leave a defined area, the thermostat can switch to an energy-saving away mode․ Upon returning, it proactively prepares your home for your arrival, ensuring optimal comfort․
Explore smart features like learning recovery, which anticipates temperature changes needed to reach your setpoint on time․ Utilize smart alerts to receive notifications about unusual temperature fluctuations or system issues․ These features combine to create a truly connected and responsive home climate control experience․
Troubleshooting Common Issues
Encountering problems? Let’s address frequent concerns․ If the thermostat isn’t powering on, verify the C-wire connection is secure and receiving power․ Double-check the breaker hasn’t tripped․ For Wi-Fi issues, ensure your router is functioning correctly and the thermostat is within range․ Restart both the thermostat and your router․
If connectivity persists, consult the Honeywell Home app for detailed troubleshooting steps․ Review the wiring diagram to confirm correct wire placement․ Remember, incorrect wiring can cause operational failures․ For unresolved issues, refer to the error code section or contact Honeywell Home Support for assistance․
Thermostat Not Powering On

If your Rth9585WF fails to power on, begin by verifying the C-wire connection․ A secure and properly powered C-wire is crucial for operation․ Inspect the breaker panel to ensure the circuit supplying power to the thermostat hasn’t tripped․ Confirm all wiring connections are tight and correctly seated on the terminal blocks․
Try briefly removing and re-attaching the thermostat to the backplate to reset the connection․ If problems persist, check the voltage requirements outlined in the system compatibility section․ A lack of sufficient voltage can prevent startup․ Consult a qualified HVAC technician if you’re uncomfortable with electrical work․
Wi-Fi Connection Problems
Experiencing difficulty connecting your Rth9585WF to Wi-Fi? First, ensure your home network is functioning correctly and broadcasting a 2․4 GHz signal – the thermostat doesn’t support 5 GHz networks․ Verify you’ve entered the correct Wi-Fi password during setup within the Honeywell Home app․ Restart both your router and the thermostat; this often resolves temporary connectivity issues․
Check the distance between the thermostat and your router; excessive distance or obstructions can weaken the signal․ Confirm your router’s firewall isn’t blocking the thermostat’s connection․ If issues continue, try temporarily disabling the router’s security features for testing purposes (re-enable afterward!)․
Resetting the Rth9585WF Thermostat
Need to reset your Rth9585WF? A soft reset, restarting the thermostat, can often resolve minor glitches․ Navigate to the settings menu on the thermostat display and select “Restart․” For a factory reset – erasing all settings and returning the thermostat to its original state – the process is slightly different․
Press and hold the reset button (typically a small recessed button) on the thermostat for approximately 10-15 seconds․ Confirm the reset when prompted on the screen․ Be aware that a factory reset requires re-connecting to Wi-Fi and re-configuring all your preferences․ This is useful if you’re selling or re-purposing the thermostat․
Understanding Error Codes
The Rth9585WF utilizes error codes to diagnose system issues․ These codes appear on the thermostat display, providing clues about the problem․ Common codes include “E1” indicating a loss of communication with the HVAC system, and “E2” signaling a sensor malfunction․ Refer to the complete error code list in this manual or on the Honeywell Home support website for detailed explanations․
Troubleshooting often begins with identifying the error code․ Once identified, consult the corresponding solution․ Some errors require professional assistance, while others can be resolved with simple checks like battery replacement or wiring verification․ Ignoring error codes can lead to further system damage․
Maintaining Your Thermostat
Regular maintenance ensures optimal performance of your Rth9585WF․ Periodically, gently clean the thermostat faceplate with a soft, dry cloth to remove dust and debris․ Avoid using liquids or abrasive cleaners, as these can damage the display․ Check the batteries (if applicable) annually and replace them as needed to prevent unexpected shutdowns․
Ensure proper airflow around the thermostat by keeping it clear of obstructions like furniture or curtains․ Inspect the wiring connections annually for tightness and corrosion․ If you notice any issues, consult a qualified HVAC technician․ Proper care extends the lifespan of your thermostat․
Warranty Information
Honeywell Home warrants this Rth9585WF thermostat to be free from defects in material and workmanship for a period of one year from the date of purchase․ This warranty applies to normal residential use․ It does not cover damage resulting from misuse, abuse, improper installation, or unauthorized modifications․
To obtain warranty service, contact Honeywell Home Support with proof of purchase․ Defective products will be repaired or replaced at Honeywell’s discretion․ This warranty is your exclusive remedy․ Honeywell is not liable for incidental or consequential damages․ See full warranty details online or in the product packaging․
FCC Compliance
This Rth9585WF thermostat complies with part 15 of the FCC Rules․ Operation is subject to the following two conditions: (1) This device may not cause harmful interference, and (2) this device must accept any interference received, including interference that may cause undesired operation․
Changes or modifications not expressly approved by Honeywell could void the user’s authority to operate the equipment․ This equipment has been tested and found to comply with the limits for a Class B digital device, pursuant to part 15 of the FCC Rules․ These limits are designed to provide reasonable protection against harmful interference in a residential installation․
Contacting Honeywell Home Support
For assistance with your Rth9585WF thermostat, Honeywell Home Support offers multiple avenues for help․ Visit our website at support․honeywellhome․com for FAQs, troubleshooting guides, and downloadable resources․ You can also reach our dedicated support team by phone at 1-800-468-1502, available Monday through Friday, 8 AM to 8 PM EST․
Alternatively, explore our online community forum to connect with other users and share experiences․ Detailed contact information and support options are also available within the Honeywell Home app․ We are committed to providing excellent customer service and ensuring your complete satisfaction with your smart home system․